Monday, December 16, 2013
Team Dancing Christmas Tree!
Heres a photo of Team Dancing Christmas Tree (minus Kelly :( because she had to work) at the Design Project expo that took place on Friday, the 13th. Overall it was a great presentation, except for the fact that our Christmas tree didn't like all the commotion going on around it. Our tree was too sensitive to the loudness of the expo and was not working properly. However, we do have a video showing our chrismas tree dancing to Christmas music! This video was shown during our presentation. This project came out geat, except for the sensitivity of our sound sensor (which is a good & bad thing). Great work Team Dancing Tree!

-DK
Thursday, December 12, 2013

Assembly process
Almost there! Beginning the assembly process. Plenty of super glue, wires, glitter & coffee. Updates to come!

Tuesday, December 10, 2013
Basic Motion Assembly in Solid Works
The following animation is the basic design of our Dancing Christmas Tree. The movement of the Christmas tree will be activated by the sound frequency received from the sound detector piece we received a few weeks ago. The Tree will rotate, and moved side to side to dance along to the music. The LED is not included in the Solid Works assembly, but will be placed inside of the hole of the star, and will be lit up as it rotates.
The assembly of the Dancing Tree will be completed with in the next two days, seeing as the tree frame has be successfully printed.
New post soon!
Sunday, December 8, 2013
First Round of Modifications
For the first modification, we had to drill the hole in the 3D printed star bigger. The hole in the star was not big enough for the LED to fit into the star.


The second thing that was done, was to solder the wires onto the LED that will be put into the star.

This is a picture of the LED soldered onto the wires, and inside of the star.

Friday, December 6, 2013
Group Meeting 12/6/13
Group members present: Devon and Rachael
Todays agenda:
1. Our tree base and star have officially been printed. Sadly we did not make the hole for the LED big enough on the star so we will need to go in and solder the hole a little bit bigger. We are still waiting for the actual tree to come back so we can start our assembly.
2. On Sunday Devon and I (Rachael) plan to meet up and work on the project summary and make the video for the part assembly.
3. For the tree we have decided to switch from covering it in felt to covering in garland to give the tree a more realistic look, it also will allow us to more easily get to the parts inside in case anything goes wrong with the LEDs or motors. We also will purchase a small wooden box for the base.
Todays agenda:
- Inspect Parts
- Discuss weekend meeting plans
- Discuss final supply list
1. Our tree base and star have officially been printed. Sadly we did not make the hole for the LED big enough on the star so we will need to go in and solder the hole a little bit bigger. We are still waiting for the actual tree to come back so we can start our assembly.
2. On Sunday Devon and I (Rachael) plan to meet up and work on the project summary and make the video for the part assembly.
3. For the tree we have decided to switch from covering it in felt to covering in garland to give the tree a more realistic look, it also will allow us to more easily get to the parts inside in case anything goes wrong with the LEDs or motors. We also will purchase a small wooden box for the base.
Wednesday, December 4, 2013
First Two Parts Fabricated!
Our first 2D printed part has been created! The star for the top of our dancing Christmas tree which will house an LED:


The second part that is completed is the base for our Christmas tree. This part is laser cut from 1/8" thick acrylic with a 4" diameter:
The frame for our Chrismas tree is currently in the queue for printing, it will hopefully be done in the next few days.
Horay for progress!!
Wednesday, November 27, 2013
Meeting summary thus far.
SO.
This post will just be a quick summation of what we have achieved for the duration of our design project.
Our idea for the project is a Christmas tree that moves to the sound of music. Accessories of the tree include a blinking led which will be put at the top of the tree inside the star.
We ordered our sound sensor piece and got it work beautifully.
We created all of our components and parts on solid works such as the frame of the tree, the star of the tree, and the platform on which the tree will be mounted on. We completed and submitted our designs and should be expecting them by the our next meeting, sometime after returning from Thanksgiving break.
We have a working prototype for our code and it's a work in progress. It'll be ready in no time.
More detailed documentation are posted in blog.
We've had a total of 4 meetings so far.
Meeting 1: November 13@3
Duration: 55 min
Attendance: Devon, Rachael, Kelly
Our goal for this meeting was to have a solid idea and what were doing for the project. It was achieved by the tree idea and we ordered our sensor to get the plan into motion.
Goal attained.
Meeting 2: November 20@3
Duration: 50 min
Attendance: Devon, Rachael, Kelly
Our goal for this meeting was to go through the list of materials we were going to need to assemble everything. We drew out prototypes and started solid works.
Goal attained.
Meeting 3: November 25@10
Duration: N/A
Attendance: Devon, Rachael
Our goal for this meeting was to work on the platform and how to incorporate the blinking led into the star.
Goal attained.
Meeting 4: November 26@12:30
Duration: 45 min
Attendance: Devon, Rachael, Kelly
Our goal in this meeting was to complete our designs for submission. We finished and modified our frame and star and had them ready.
Goal attained.
Next meeting, meeting 5,
sometime after the break.
Programming and codes.
Along with our components, we also had to some coding. Coding is the harder part of the project I would think. We have a simple one to start.
******************************************************************************************************************************************************************
******************************************************************************************************************************************************************
This what we have so far, it should make the sound sensor work. We'll still need to modify it to accommodate for the blinking led. That should be simple though. Things are looking well for us.
******************************************************************************************************************************************************************
#include <Servo.h>
Servo myservo;
void setup()
{
myservo.attach(9);
Serial.begin(9600); //open serial port, set the baud rate to 9600 bps
}
void loop()
{
int val;
val=analogRead(5); //connect mic sensor to Analog 0
Serial.println(val,DEC); //print the sound value to serial
delay(50 );
val=map(val, 0, 1023,0,255);
analogWrite(11,val);
myservo.write(val);
}
******************************************************************************************************************************************************************
This what we have so far, it should make the sound sensor work. We'll still need to modify it to accommodate for the blinking led. That should be simple though. Things are looking well for us.
Day 4.
We had our 4th meeting yesterday at 12:30 during Rachael's lab section. I am glad to say that it was indeed productive. We were working on solid works making models of our components, the frame and the star.

We modified our frame. It's now standing at a staggering height of 4.5 inches. It'll be great. I'm pretty excited about this one.
 After the basic size and shape of the cone, we cut holes into it and made it into a frame so it wouldn't go above the maximum criteria for the 3D printing. This process in particular was a challenge at first because we were weren't use to cutting on an axis or rounded surface. It was kind of daunting at first but we figured it out eventually. As luck would have we discovered a tool call a revolved cut, that made things so much easier. Just so much easier. And Voila! We have ourselves a frame.


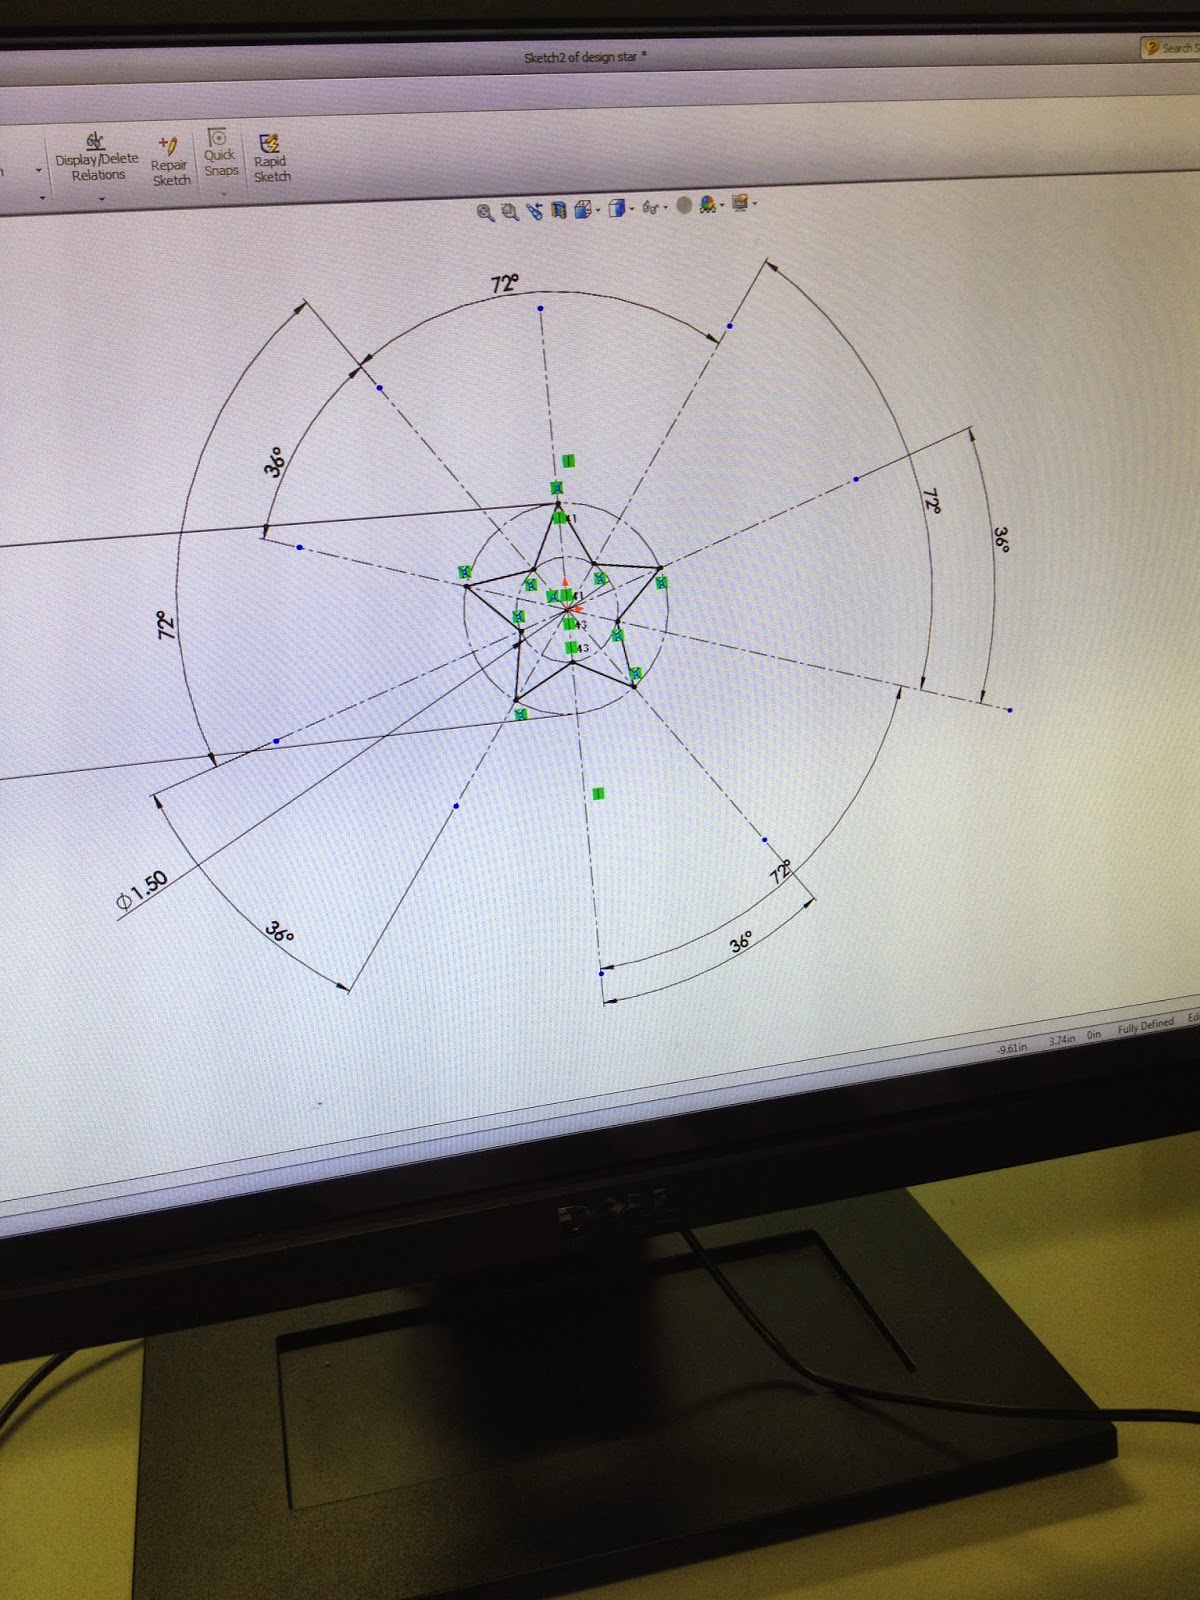
Our next component was our star. Devon made the star on solid works with us giving her pointers on how to construct it. At first it looks kind of crazy with all the lines and stuff. We didn't know how to start. We wanted a perfect star, it had to be perfect. It just had to. We eventually added more lines at equally spaced angles and connected lines from line to line like the picture above on the right. Our work in progress.
 Our completed star.
Behold, it was perfect and uniform, just like we wanted.
 We cut a hole through its center for the led light.
A start to a fabulous project.
That was Rachael's iced coffee by the way. It somehow crept into the photo.
No drinks in the lab, she should know better. Oh well. What a rebel.
And with the completion of our components for 3D printing, we submitted our pieces. The duration time of our parts estimated a combined total of approximately 8 hours. Good luck with that.
We ended our meeting after that and wished each other a Happy Thanksgiving before the break. We'll be meeting again once the break is over and hopefully our parts will be ready.
Meeting Duration: 45 min.
We modified our frame. It's now standing at a staggering height of 4.5 inches. It'll be great. I'm pretty excited about this one.
After the basic size and shape of the cone, we cut holes into it and made it into a frame so it wouldn't go above the maximum criteria for the 3D printing. This process in particular was a challenge at first because we were weren't use to cutting on an axis or rounded surface. It was kind of daunting at first but we figured it out eventually. As luck would have we discovered a tool call a revolved cut, that made things so much easier. Just so much easier. And Voila! We have ourselves a frame.Behold, it was perfect and uniform, just like we wanted.
A start to a fabulous project.
That was Rachael's iced coffee by the way. It somehow crept into the photo.
No drinks in the lab, she should know better. Oh well. What a rebel.
And with the completion of our components for 3D printing, we submitted our pieces. The duration time of our parts estimated a combined total of approximately 8 hours. Good luck with that.
We ended our meeting after that and wished each other a Happy Thanksgiving before the break. We'll be meeting again once the break is over and hopefully our parts will be ready.
Meeting Duration: 45 min.
Monday, November 25, 2013
November 25th 2013
This morning Devon and I met up to continue work on our project, sadly Kelly could not be here because she had a test.
I worked on our laser cut base part, which will be a circle with a once inch diameter and .6 hole in the center for the servo motor and two quarter inch holes to be used for the threading of the wires. Devon created a perfect start that will be printed for the top of our Christmas, later we are going to try and drill a hole so we can put an LED through the top and have the start light up as well, but that is on our if time permits list.
If Time Permits:
LCD screen to say Christmas sayings
Incorporate LED into the tree topper
Double joint the Christmas Tree? (somehow)
Christmas Tree having moving eyes
Twerkin Christmas Tree
Tomorrow we are all meeting up during my lab session (Section 803 with Professor Thompson at 12:30) to further work on our design and strategy for how we plan on carrying out this project. Hopefully put a bigger dent on the Arduino software code, and make plans for after break on finishing the project all together.
Wednesday, November 20, 2013
Day 2
Day 2.
Wednesday, 3:00pm.
So we have our idea, it's pretty solid. We drew out what the object will basically look like. We got all the parts we were going to need like lego pieces, platform material, and started the our solid works assembly.
The sensor we ordered came in and it actually works. Our money wasn't wasted. Hallelujah.
We tested out the sensor by equipping it to our audrino board and have it listen to music. It totally read out numbers. Really responsive, even snaps produce numbers. Our sensor isn't deaf. Success.
Professor Sully came by and got a little too excited with our project and totally started throwing down some programming codes. We got our sensor to listen to music and have an led light blink in correspondence to the music via codes. It was awesome.
We got the cone on solid works drawn. It'll be like a frame rather than a solid piece.
We can decorate and craft the perfect minature christmas tree with that and have it weigh practically nothhing. By having a frame instead of it being solid, it'll let us make the frame super big so we could have like a foot tall tree. Just what we need to make design lab worth while. A foot tall christmas tree.
Motto of the meeeting ajourned, Go big or go home.
Next meeting date: Friday@10am, 11/20/13
Meeting duration: 50 min

.jpeg) I tried posting the video of the light blinking in conjunction with the music but there were some technical difficulties. Maybe in another post it'll work.
I tried posting the video of the light blinking in conjunction with the music but there were some technical difficulties. Maybe in another post it'll work.
Wednesday, 3:00pm.
So we have our idea, it's pretty solid. We drew out what the object will basically look like. We got all the parts we were going to need like lego pieces, platform material, and started the our solid works assembly.
The sensor we ordered came in and it actually works. Our money wasn't wasted. Hallelujah.
We tested out the sensor by equipping it to our audrino board and have it listen to music. It totally read out numbers. Really responsive, even snaps produce numbers. Our sensor isn't deaf. Success.
Professor Sully came by and got a little too excited with our project and totally started throwing down some programming codes. We got our sensor to listen to music and have an led light blink in correspondence to the music via codes. It was awesome.
We got the cone on solid works drawn. It'll be like a frame rather than a solid piece.
We can decorate and craft the perfect minature christmas tree with that and have it weigh practically nothhing. By having a frame instead of it being solid, it'll let us make the frame super big so we could have like a foot tall tree. Just what we need to make design lab worth while. A foot tall christmas tree.
Motto of the meeeting ajourned, Go big or go home.
Next meeting date: Friday@10am, 11/20/13
Meeting duration: 50 min
Wednesday, November 13, 2013
November 13, 2013, Day 1.
Team formation. Members unite.
1. Devon Kraus
2. Rachael Rennie
3. Kelly Chan
Meeting date: 11/13/13 @3PM
We threw around ideas here and there about what to do for the arduino project. We agreed on it having a sound/sensor component. The object of discussion would move and light up/down depending on the motions/sounds/vibrations/voltage change detections via arduino.
We have decided on a dancing tree which would move and blink. It has yet to have a name. There has been talk of Gerald and Timber but its still an open discussion, a work in progress.
We need to find a mechanism that senses the sounds and such that we would use for our tree.
We found an analog sound sensor that would do the trick.
Under $10.00, shipping excluded,
http://www.dfrobot.com/wiki/index.php/Analog_Sound_Sensor_(SKU:_DFR0034)
the wiki even includes a sample code.
Score.
Ordered from the Jameco.
Domestic shipping, expected in about 3-5 days.
3D printing, and other decorative pieces were discussed.
Further/regular meeting dates were discussed.
Wednesdays@3pm
Meeting Duration: 55 min
Subscribe to:
Comments (Atom)